Friday, January 31, 2014
Labels:
packet analysis
,
Wireshark
Packet Analysis 101 - Wireshark Capture Filters
We're going to first discuss one of the two types of filtering available with Wireshark: capture filters. Before I go any further, if you're confused about what filters are and/or what Wireshark is, check out my first blog post to learn how to take a packet capture.

To set a capture filter, look for the Capture Options button on the left side underneath the interface listing. In the pop-up window, look for the Capture Filter option on the left and when you click it you'll see the short list of pre-defined capture filters.

You can select one of the templates and modify it to target the data you're hunting/troubleshooting.
Note the other parameters you can set, such as a time or size limit. When you modify a filter template or enter your own expression (based on those allowed), until it's in the proper syntax, Wireshark will highlight the Capture Filter field in red. Once you set the capture filter and click Start, Wireshark will begin monitoring the chosen interface using that capture criteria.
It's important to note that the capture filters are a different syntax than the display filters, and they're based on tcpdump filters. Check out a list of some sample capture filters.
When you open the capture filter list again, your new entry will be there! As I collect use cases for capture filters, I'll post a page with an index for easy reference.
Next up, we'll be discussing display filters.
Read More
Capture Filters
An often underused (where's the love?) component of Wireshark is the capture filter. Most people fire up Wireshark, select an interface and start capturing everything. That's great unless you have a scenario where you need to leave a capture running for a long period of time and/or have to sift through a huge amount of packets. Side note: This is also extremely handy in the Capture the Packet CTF.
To set a capture filter, look for the Capture Options button on the left side underneath the interface listing. In the pop-up window, look for the Capture Filter option on the left and when you click it you'll see the short list of pre-defined capture filters.
You can select one of the templates and modify it to target the data you're hunting/troubleshooting.
 |
| Selecting the template |
 |
| Changing the default value from "192.168.0.1" to 172.16.90.101 |
It's important to note that the capture filters are a different syntax than the display filters, and they're based on tcpdump filters. Check out a list of some sample capture filters.
Create Your Own Capture Filter
To create your own filter, when you have the Capture Filter pop-up open, click on New. Change the Filter name and Filter string fields to the values you want, and click OK. |
| This example looks for HTTP GET requests, excerpted from the Wireshark Capture Filter wiki page |
Next up, we'll be discussing display filters.
Tuesday, January 28, 2014
Labels:
packet analysis
Ten years ago, when someone couldn't check their email or perform a web-based task, it was always a question of whether the server was actually receiving power. These days, servers have drastically increased their availability so that server-specific outages have become rare. That fact means the blame when an application doesn't work typically falls on a device in the network boundary, and more often than not, the proxy and/or firewall.
So, how do you figure out where to target your efforts if your network looks like this?
Read More
Packet Analysis 101 - Initiating the Capture
Let's Look at the Packets!
How often have you heard, "This application isn't working. Is it the [IPS/IDS/Proxy/Firewall] again?"Ten years ago, when someone couldn't check their email or perform a web-based task, it was always a question of whether the server was actually receiving power. These days, servers have drastically increased their availability so that server-specific outages have become rare. That fact means the blame when an application doesn't work typically falls on a device in the network boundary, and more often than not, the proxy and/or firewall.
So, how do you figure out where to target your efforts if your network looks like this?
 |
| Only a slight exaggeration... |
Obviously there are other elements to troubleshoot, but it's often helpful and sometimes required to take a packet capture.
What is a Packet?
A packet is a binary package (001010101010) of information capable of being transmitted across the network from one device to another. We'll get into some specific examples in later posts. Packets have multiple layers, often referred to in sections as headers and footers. The headers contain transmission-related information with the footer containing the application data.
A common reference for packet header analysis is the SANS TCP/IP and tcpdump cheat sheet. The image below shows excerpts including the Ethernet header (OSI Layer 2), the IP header (OSI Layer 3), and the TCP header (OSI Layer 4).
 |
| TCP/IP headers from SANS, with Ethernet added by me |
Notice how I arranged the header in layers. These layers follow the abstract, but logical, OSI model. It's also helpful to recognize them this way when you analyze packets from a capture.
What is a Packet Capture?
A packet capture is exactly what it sounds like, although some people refer to it as "packet sniffing". It's a collection of network packets transmitted by and/or between any number of combinations of such devices as those in the nightmare diagram above. The next logical question is...
How do I Capture Packets?
People more commonly ask, "How do I take a packet capture?" To do so, we need a tool. For the express purpose of capturing packets, several are available including: Wireshark (my fav), Network Miner, NetWitness Investigator (Direct Download Link), Microsoft Network Monitor, and Capsa. They all have unique attributes and capabilities, so I suggest experimenting with them to find out which one you prefer.
To get you started, our friends over at Hak5's YouTube channel made a great introductory video using Wireshark:
Although there are video tutorials on the other tools, those videos focus more on the use of the tool rather than initiating a capture using the tool. If I find them, I'll post them, but in the mean time check out Wireshark!
Sunday, January 12, 2014
Labels:
HTTPS
,
SSL
HTTPS, SSL, and [Perfect] Forward Secrecy
The events of 2013 have raised awareness about the capability to eavesdrop on Internet conversations many thought were protected from eavesdropping. There are many articles about HTTPS, SSL, and [Perfect] Forward Secrecy, but I've found that none really reference the information in a visual way. Since we're all primarily visual creatures, I think it would be helpful to some to post a more visual-oriented reference to this discussion.
The Basics
First, a review of the OSI model. This model sets out a visual representation of what happens when information is transmitted from one system to another, such as when your home computer, laptop, or tablet loads a web page. Think of the OSI model as an information workflow process that systems use to either receive data or send it out. The model is organized into 7 layers, depicted here:

The mechanisms of HTTPS, SSL, and Perfect Forward Secrecy take place at the top three layers: Application, Presentation, and Session. More specifically, and for the sake of simplification, we'll say they happen at the Application and Session layers.
When you sit down at your machine and are ready to perform some online banking or shopping, this is what typically happens. You type in your bank's website, and your machine sends an HTTP request to the banking or ecommerce site.

It's at this stage where the bank or ecommerce site will send a redirect message to your browser (Internet Explorer, Chrome, Firefox, etc) providing instructions to contact the server back using an HTTPS request. Let's narrow our scope down on that part of the conversation:

When communicating sensitive information such as banking (account numbers) or ecommerce (credit card numbers), we don't want that data to be passed "in the clear" because someone could easily see what we're typing. Banks and retail stores don't want to be held accountable for letting someone steal your data, so they attempt to secure the communication when you access the portal. That's why in the graphic above, when you send a "clear text" request, the organization's server will typically send your browser an instruction to send a new request in a secure way. The browser knows where that new location is via the location response header.
Now our browser will begin secure communication negotiation with the banking or ecommerce server. Before the browser sends the request for the web page again, it establishes an agreed-upon secure communication method with the server.

Notice how in the graphic above I only focus on the SSL part of the conversation? It's important to note that SSL is independent of the HTTP application protocol. You can send other types of traffic over SSL such as File Transfer Protocol, Internet Content Adaptation Protocol, and Simple Mail Transfer Protocol. When we think of our banking and ecommerce sites, we always see the https, which is HTTP over SSL. Below is an illustration, using the same example above:

The Details
Now on to [Perfect] Forward Secrecy. What exactly does it mean, and why do I bracket out the "Perfect"? Perfect Forward Secrecy (PFS) is a level up from Forward Secrecy (FS), and both are improved where no implementation at all is used.
How do they protect the encrypted traffic? Using the Diffie-Hellman exchange, they ensure that the keys exchanged between "Home PCs" and servers are done so in a secure manner. It's a psuedo-randomization of the session key so that the asymmetric keys can be exchanged.
To clarify, in the picture above where we see the SSL session established, without using PFS or FS the server would not randomize the keys, using the same keys in conversations with however many "Home PCs" wanted to communicate.
The danger of handling encryption/decryption of SSL messages this way is that if the private key is compromised in anyway, all traffic collected using this keyring could then be decrypted.
Using Forward Secrecy, each conversation with each different "Home PC" would use the Diffie Hellman algorithm set to generate random session keys to determine the secure key exhange of the RSA keyring. Because the key exchange mechanism is different per "Home PC", gaining access to the private RSA key would have to be run through the Diffie-Hellman algorithm to find the key exchange used for each session.

Now, running the recovered (hacked?) private key along with the Diffie-Hellman algorithm would only reveal communication between that one "Home PC" the key was cracked for and the server.
And lastly, Perfect Forward Secrecy uses different session keys within the same conversation with each "Home PC" so that multiple keys are used per conversation:

So, what does this mean in terms of security?
We eliminate the capability of someone without key-breaking tools to eavesdrop when we switch from HTTP to HTTPS. SSL without PFS or FS means that if someone is able to crack the key used, then they have access to all conversations between that server and all systems with which it communicates. SSL with Forward Secrecy operations prevent all conversations from being monitored by the cracking of one key, but if someone does crack that key, then they would get access to all conversations between that server and one endpoint. Finally, SSL with Perfect Forward Secrecy ratchets up the difficulty even more, because now an eavesdropper must crack multiple keys within a single conversation.
The focus here is the number of keys involved, and increasing the number of keys increases the time it takes to break those keys.
Self Assessment
So, how can you test if a website uses forward secrecy or perfect forward secrecy? Check out Qualys' SSL Labs. When you run a report on a domain, there's a check to see if it supports Forward Secrecy. Since there was a recent article about Yahoo enabling HTTPS by default for its mail service, let's run a report:

Looks like Yahoo isn't there yet. How about GMail?
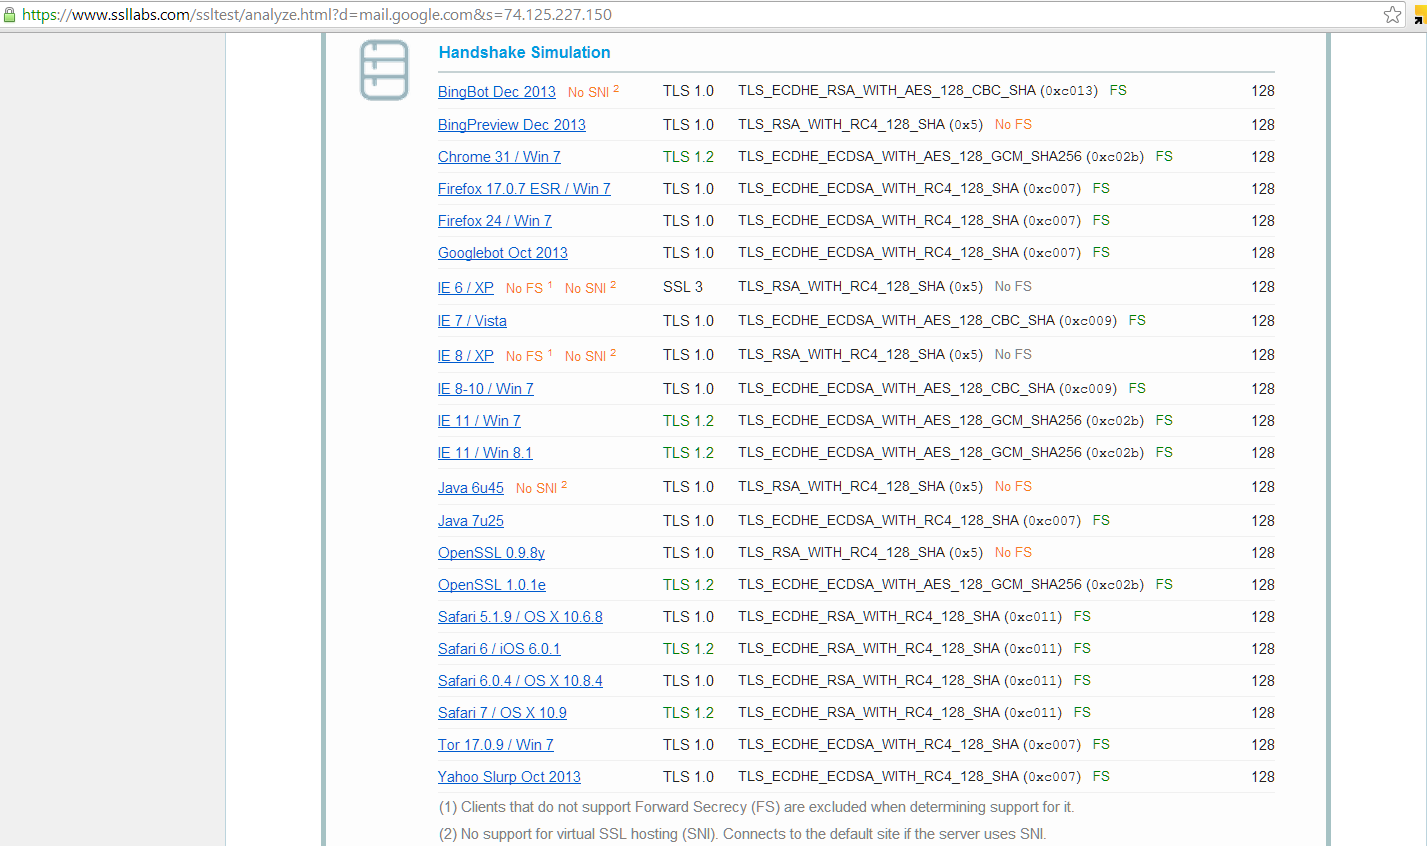
What's the main hesitation and why wasn't it already implemented? Performance. By increasing the number of keys, we're adding more overhead to the server. In spite of that, I think we can safely predict that this is a feature that will be gaining steam in 2014.
Reference:
http://news.netcraft.com/archives/2013/06/25/ssl-intercepted-today-decrypted-tomorrow.html
Read More
The Basics
First, a review of the OSI model. This model sets out a visual representation of what happens when information is transmitted from one system to another, such as when your home computer, laptop, or tablet loads a web page. Think of the OSI model as an information workflow process that systems use to either receive data or send it out. The model is organized into 7 layers, depicted here:
The mechanisms of HTTPS, SSL, and Perfect Forward Secrecy take place at the top three layers: Application, Presentation, and Session. More specifically, and for the sake of simplification, we'll say they happen at the Application and Session layers.
When you sit down at your machine and are ready to perform some online banking or shopping, this is what typically happens. You type in your bank's website, and your machine sends an HTTP request to the banking or ecommerce site.
It's at this stage where the bank or ecommerce site will send a redirect message to your browser (Internet Explorer, Chrome, Firefox, etc) providing instructions to contact the server back using an HTTPS request. Let's narrow our scope down on that part of the conversation:
When communicating sensitive information such as banking (account numbers) or ecommerce (credit card numbers), we don't want that data to be passed "in the clear" because someone could easily see what we're typing. Banks and retail stores don't want to be held accountable for letting someone steal your data, so they attempt to secure the communication when you access the portal. That's why in the graphic above, when you send a "clear text" request, the organization's server will typically send your browser an instruction to send a new request in a secure way. The browser knows where that new location is via the location response header.
Now our browser will begin secure communication negotiation with the banking or ecommerce server. Before the browser sends the request for the web page again, it establishes an agreed-upon secure communication method with the server.
Notice how in the graphic above I only focus on the SSL part of the conversation? It's important to note that SSL is independent of the HTTP application protocol. You can send other types of traffic over SSL such as File Transfer Protocol, Internet Content Adaptation Protocol, and Simple Mail Transfer Protocol. When we think of our banking and ecommerce sites, we always see the https, which is HTTP over SSL. Below is an illustration, using the same example above:
The Details
Now on to [Perfect] Forward Secrecy. What exactly does it mean, and why do I bracket out the "Perfect"? Perfect Forward Secrecy (PFS) is a level up from Forward Secrecy (FS), and both are improved where no implementation at all is used.
How do they protect the encrypted traffic? Using the Diffie-Hellman exchange, they ensure that the keys exchanged between "Home PCs" and servers are done so in a secure manner. It's a psuedo-randomization of the session key so that the asymmetric keys can be exchanged.
To clarify, in the picture above where we see the SSL session established, without using PFS or FS the server would not randomize the keys, using the same keys in conversations with however many "Home PCs" wanted to communicate.
 |
| NOTE: The "same" key is depicted above via the color purple |
The danger of handling encryption/decryption of SSL messages this way is that if the private key is compromised in anyway, all traffic collected using this keyring could then be decrypted.
Using Forward Secrecy, each conversation with each different "Home PC" would use the Diffie Hellman algorithm set to generate random session keys to determine the secure key exhange of the RSA keyring. Because the key exchange mechanism is different per "Home PC", gaining access to the private RSA key would have to be run through the Diffie-Hellman algorithm to find the key exchange used for each session.
Now, running the recovered (hacked?) private key along with the Diffie-Hellman algorithm would only reveal communication between that one "Home PC" the key was cracked for and the server.
And lastly, Perfect Forward Secrecy uses different session keys within the same conversation with each "Home PC" so that multiple keys are used per conversation:
So, what does this mean in terms of security?
We eliminate the capability of someone without key-breaking tools to eavesdrop when we switch from HTTP to HTTPS. SSL without PFS or FS means that if someone is able to crack the key used, then they have access to all conversations between that server and all systems with which it communicates. SSL with Forward Secrecy operations prevent all conversations from being monitored by the cracking of one key, but if someone does crack that key, then they would get access to all conversations between that server and one endpoint. Finally, SSL with Perfect Forward Secrecy ratchets up the difficulty even more, because now an eavesdropper must crack multiple keys within a single conversation.
The focus here is the number of keys involved, and increasing the number of keys increases the time it takes to break those keys.
Self Assessment
So, how can you test if a website uses forward secrecy or perfect forward secrecy? Check out Qualys' SSL Labs. When you run a report on a domain, there's a check to see if it supports Forward Secrecy. Since there was a recent article about Yahoo enabling HTTPS by default for its mail service, let's run a report:
Looks like Yahoo isn't there yet. How about GMail?
What's the main hesitation and why wasn't it already implemented? Performance. By increasing the number of keys, we're adding more overhead to the server. In spite of that, I think we can safely predict that this is a feature that will be gaining steam in 2014.
Reference:
http://news.netcraft.com/archives/2013/06/25/ssl-intercepted-today-decrypted-tomorrow.html
Subscribe to:
Posts
(
Atom
)


